Table of Contents
When preparing your Mac computer for repair, Apple requires “Find My” feature to be turned off. It’s crucial to disable the “Find My” to ensure a smooth repair process. This article provides two easy methods to remotely turn off “Find My” service. Once the repair is complete, you can re-enable Find My Device and continue enjoying the security features it offers.
Method 1: Disable “Find My” service using iPhone
If your Mac uses the same Apple ID with your iPhone, you can use your phone to turn off the service:
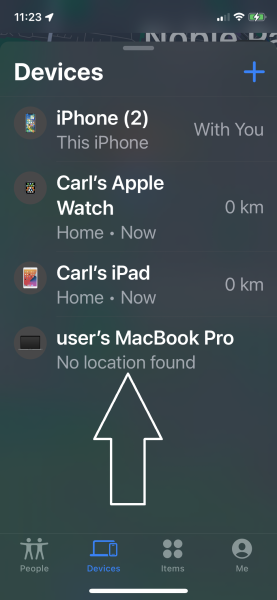
Step 1: Tap the “Find My” app on your iphone screen to open the application.

Step 2: A list of Apple devices linked to your iphone will be displayed. Tap the device to be disabled. Offline devices will have a gray indicator. You need to power off your Mac to make it offine.
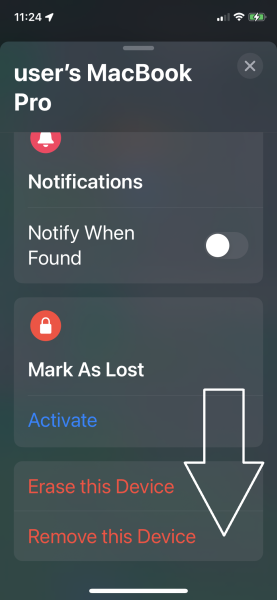
Step 3: Scroll up the screen, tap “Remove this Device” at the bottom of the screen.
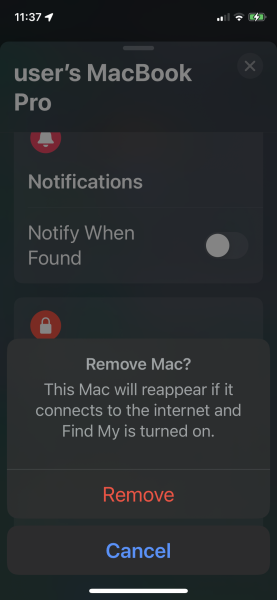
Step 4: Confirm the removal by tapping “Remove” in the confirmation message.
Note: Always choose “Remove”, not “Erase” to avoid unintentionally wiping all data from your Mac.
Method 2: Disable “Find My” service with iCloud.com
You can access your iCloud account from a browser on a Mac or a Microsoft Windows computer. You need to power off your Mac to make it “offline”, otherwise the option “Remove This Device” will not be available. Follow these steps:
Step 1: Visit Apple’s iCloud.com and log in to your account using your Apple ID.
Step 2: Click on the “Find My” icon on the iCloud screen.You may be prompted to provide your password again.
Step 3: All your devices linked to your account will be listed. Identify the device you want to remove and click it.
Step 4: Click the “Remove This Device” option.
Step 5: Click “Remove” to confirm your decision.
Note: Do not Click “Erase This Device” otherwise you delete all the data in your Mac.

